


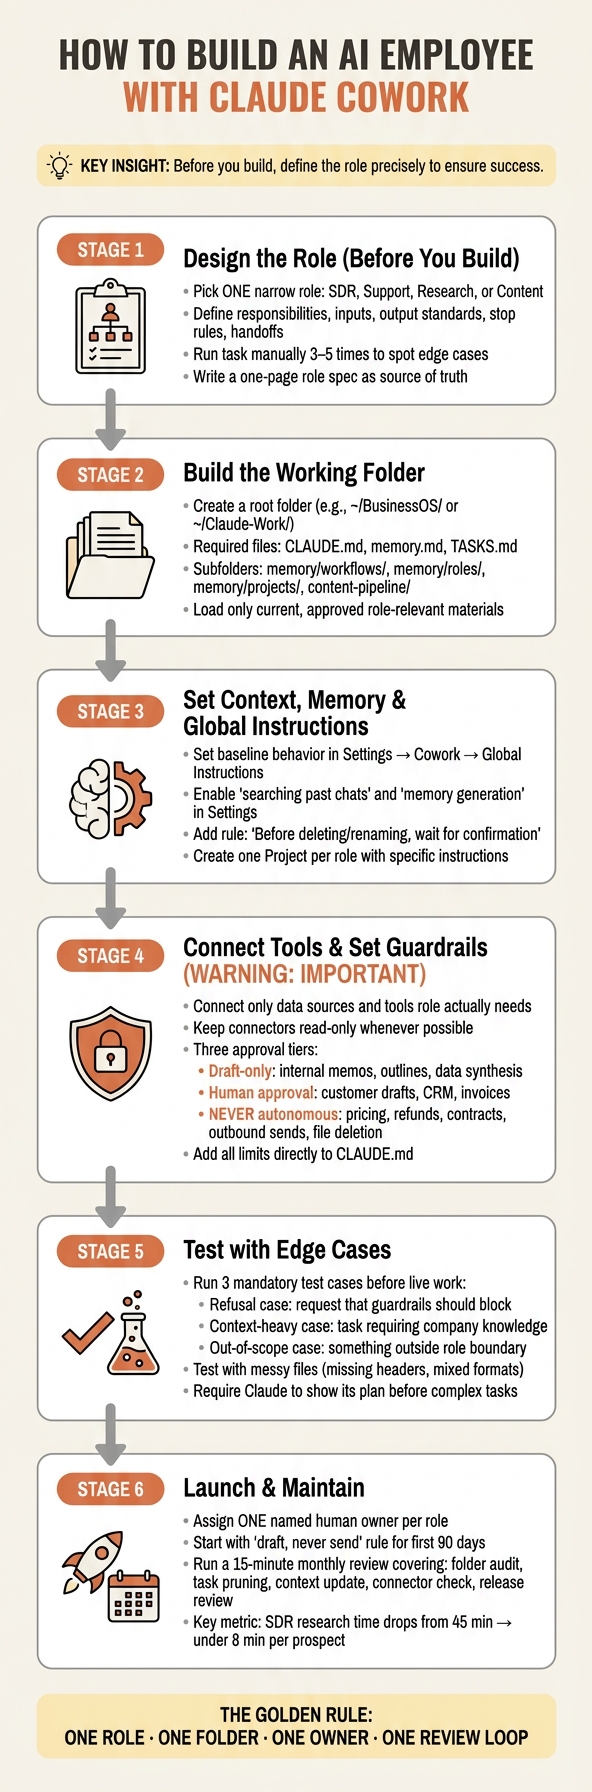
If you want Claude Cowork to do useful work, start with one job, give it a fixed workspace, limit what it can touch, and keep a human in review. I’d treat this like setting up a new teammate, not opening a chat window.
Here’s the short version:
- Pick one role with a clear payoff, like SDR, support, research, or content
- Define the job before setup:
- responsibilities
- inputs
- output standards
- stop rules
- handoff points
- Run the task by hand 3 to 5 times first so you spot edge cases
- Build one local workspace with files like:
CLAUDE.mdmemory.mdTASKS.md- SOP folders
- approved examples
- Give Claude only the files, tools, and connectors that role needs
- Keep high-risk work behind approval rules, especially:
- email sends
- refunds
- pricing changes
- file deletion
- contracts
- Test with:
- a blocked request
- a context-heavy task
- an out-of-scope task
- Launch with one owner, start with draft-only work, and review the setup every month
It might surprise you to hear that the biggest win here is often simple time savings. The article points to an SDR flow that can drop from 45 minutes per prospect to under 8 minutes. That kind of change matters when the work repeats every day.
I also like the article’s main idea: setup matters more than prompts. In other words, if the role, files, rules, and approval logic are loose, the output will be loose too.
Here’s the part I’d keep top of mind:
| Area | What matters most |
|---|---|
| Role choice | One narrow job with clear output |
| Context | Current files, SOPs, and approved examples |
| Guardrails | Hard limits on sends, deletes, money, and legal actions |
| Testing | Try edge cases before live use |
| Ownership | One human reviews, corrects, and maintains it |
If you’re building your first AI employee, I’d keep it boring on purpose: one role, one folder, one owner, and one review loop. That’s the cleanest path to steady output without extra mess.
How to Build an AI Employee: Step-by-Step Setup Guide
Claude Cowork Full Course: Build Your AI Employee From Scratch
sbb-itb-e8c8399
Design the Role Before You Build the Workflow
Start with a one-page role spec. Run the process manually 3 to 5 times first. That gives you a clean way to spot edge cases, decision points, and weak handoffs before you lock anything in.
Your spec should spell out the role’s approved tools and the triggers that start work. Then use that spec as the source for the files Claude reads in every session.
Map Responsibilities, Inputs, and Handoff Rules
For each responsibility, document three things: the source material, the autonomy level, and the point where a human needs to step in.
| Responsibility | Input Source | Approval Level | Handoff Rule |
|---|---|---|---|
| Prospect research brief | LinkedIn Sales Navigator CSV, 10-K filings | Autonomous (read and report) | Escalate if a prospect mentions a competitor not in the battlecard |
| Inbox triage | Gmail connector | Autonomous (read-only) | Flag for human if marked "Urgent" or from an investor |
| Outreach draft | ICP profile, objection handling doc | Human approval required | Save as draft; notify owner before any send |
| Competitor research | Web search | Autonomous (report only) | Save to the Research folder; human reviews weekly |
| Data deletion | Local workspace | Human approval required | Always ask; never act without confirmation [3] |
This step matters because it forces you to get concrete. “Handle inbox” sounds fine until you hit the first investor email or a message marked Urgent. That’s where handoff rules save you from messy mistakes.
Write the Success Profile and Output Standards
Define what “done” looks like before you build the workflow. A success profile gives Claude a clear quality bar, instead of a vague prompt and crossed fingers.
For an SDR role, a finished outreach draft should stay under 100 words, match the ICP, and address at least one known objection. For a support agent role, a finished reply should follow the approved tone guide and confirm the customer’s next step.
Build this profile from 2 to 3 strong past outputs. In other words, show Claude what good looks like with examples that already worked.
A clear success profile also makes the skill file easier to write. It sharpens the Output Format and edge cases, so Claude can tell the difference between a rough draft and something a teammate can actually use.
Use a Simple Role Design Template
Once you’ve mapped responsibilities and success standards, pull it all into one role design document. This becomes the base for your CLAUDE.md file and any skill files you build later.
| Field | Description |
|---|---|
| Role Name | The specific job title being automated (e.g., SDR, Content Ops) |
| Mission | One sentence on the role’s primary objective |
| Recurring Tasks | Task list with frequency: Daily, Weekly, or Ad-hoc |
| Approved Actions | What the AI is allowed to do (e.g., "Create draft files", "Read CRM data") |
| Restricted Actions | Hard limits (e.g., "Never send emails", "Never delete files") |
| Required Inputs | Specific folders or connectors the role needs access to |
| Output Format | Preferred structure: Markdown, spreadsheet, JSON |
| Target | Response time or quality benchmark (e.g., "Summarize inbox by 9:00 AM") |
| Human Owner | The person responsible for reviewing and approving the AI’s work |
Keep the Restricted Actions field non-negotiable.
Next, turn this spec into the working folder, context files, and rules Claude will use.
Set Up Claude Cowork with Context, Memory, and Working Files
Claude Cowork starts each session with zero memory, so you need fixed instructions, source files, and clear rules if you want steady output. First, make sure your plan includes Cowork access before you do any setup.
Create the Working Folder and Core Context Files
Create one root folder on your local machine, such as ~/BusinessOS/ or ~/Claude-Work/, and give Claude access to that folder. Claude Cowork reads from the folder you choose, so if your files live in the cloud, copy them into this workspace first.[5][8]
Inside that root folder, set up a simple structure that matches the role you mapped out earlier:
| File / Folder | Purpose |
|---|---|
CLAUDE.md |
Core identity, standing instructions, and "Never Do" rules [7][4] |
memory.md |
Lessons learned, preferences, and feedback from completed tasks |
TASKS.md |
Kanban-style task tracker for active, pending, and completed work [7] |
memory/workflows/ |
Step-by-step SOPs for repeat tasks [7] |
memory/roles/ |
Role definitions and agent personas [7] |
memory/projects/ |
Background context for specific clients or campaigns [7] |
content-pipeline/ |
Active drafts and working files [7] |
Use the role spec as the source of truth for every file you load.
Load only the files that role will actually use. For an SDR role, that usually means a CRM export, ICP profiles, objection-handling docs, and 2 to 3 outreach samples that already performed well. For a support agent, load your help docs, approved tone guide, and past ticket resolutions.
This setup makes updates much easier. If you need to change a guardrail or update an SOP, you edit one file instead of digging through old chat threads. CLAUDE.md holds the role identity and hard limits, TASKS.md tracks active work, and memory.md stores lessons learned.
Set Global Instructions and Memory Rules
Go to Settings → Cowork → Global Instructions and set your baseline behavior there. That includes tone, naming rules, safety rules, and escalation logic that should apply in every session.[11][12] Then create one Project for each role and paste the role-specific definition, constraints, and output standards into the Instructions field so they stay active in that project.[10]
If you want Claude to reference past work with more consistency, go to Settings → Capabilities and turn on "searching past chats" and "memory generation."[12]
Add this rule to Global Instructions right away:
"Before deleting or renaming any file, wait for my confirmation." [12]
Load Approved Examples and Source Materials
Load only current, approved materials. Old pricing docs, stale brand guidelines, or deprecated SOPs can push Claude toward output that sounds sure of itself and still gets the details wrong.
Think of the working folder like a new hire’s onboarding packet. If you wouldn’t hand it to a person on day one, don’t put it in the folder for Claude.
With the workspace in place, you can move on to tools, guardrails, and approval logic.
Add Tools, Guardrails, and Approval Logic
A workspace folder and a role definition are a solid start. However, they don’t make the AI employee useful by themselves. Usefulness comes from two things: access to the right data and firm limits on what Claude can do with it. The next step is simple. Tighten access and set clear action limits.
Connect the Data and Tools the Role Actually Needs
Think of connectors as data feeds and tools as the actions they unlock. [6] In other words, data tells Claude what to look at, and tools decide what it can touch. The rule here is straightforward: give each role access only to what it needs to do the job, and keep connectors read-only when you can. [3]
Map only the systems that role already uses. Use only the row that matches your chosen role.
| Role | Required Data Sources (Read) | Optional tools (draft/edit) | Never autonomous |
|---|---|---|---|
| Sales | CRM (Salesforce, HubSpot), call recordings | Email (Gmail/Outlook), Slack, LinkedIn | Pricing changes, contract signatures, final quotes |
| Support | Knowledge base, ticket history | Slack, documentation folders | Refund processing |
| Finance | ERP (QuickBooks), data warehouse (Snowflake), invoices folder | Google/MS Sheets, Slack for alerts | Bank login credentials, HR records, wire transfers |
| Marketing | Content calendar, brand guidelines, analytics | CMS (WordPress), social media schedulers | Live ad spend, brand promises, public PR responses |
Set Approval Levels for Drafts, Actions, and Exceptions
Not every output carries the same level of risk, so your approval logic should match the stakes. A content outline and a wire transfer should never sit in the same bucket.
Use three tiers:
- Draft-only: internal research memos, content outlines, and data synthesis
- Human approval required: customer-facing drafts, invoices, social posts, CRM updates, and file changes
- Never autonomous: pricing changes, refunds, legal claims, contract signing, and any outbound send
Add this logic directly to your CLAUDE.md file so the rules are always there before each task. [7]
Add Guardrails for Brand, Compliance, and Privacy
The workspace folder is your first safety layer. Give Claude access only to that folder, and keep it out of payroll, HR, and other sensitive directories. [3]
Then add the next layer in CLAUDE.md. Spell out brand voice, banned words, and preferred terminology directly in the file. [9][1] Set a hard rule that credentials, identity documents, and payroll records never enter the workspace. [3]
The good news is this part doesn’t need to be fancy. It just needs to be explicit. Add one global instruction: if a rule is unclear or files conflict, ask before acting and surface the conflict. [2]
Test, Deploy, and Maintain the AI Employee
With your context files, guardrails, and approval logic set up, the next step is simple: prove it works before you give it live work. This stage isn’t about polish. It’s about finding the weird failure points your setup missed.
Run Controlled Task Tests Before Full Rollout
With the role, context, and guardrails in place, test the workflow in live-like conditions before rollout. Push Claude with edge cases, not just the easy path. That’s how you spot the small breaks that only show up in practice: missing fields, uneven file formats, or an API that fails halfway through.
Run three test cases for every role:
- A refusal case: a request that your guardrails should block
- A context-heavy case: a task that depends on company knowledge from your context files
- An out-of-scope case: something outside the role, where Claude should stay brief or say nothing useful beyond the boundary [13]
If all three work the way you expect, you’re in good shape.
Use the checklist below to validate ONLY the tasks you plan to launch first:
| Task Type | Required Input | Approval Level | Expected Output |
|---|---|---|---|
| Data Analysis | Messy CSV/Spreadsheet | Human Review (Draft) | Interactive HTML dashboard with 3 findings and 1 next action |
| Outreach Draft | Prospect Name/URL | Human Approval | Personalized email draft |
| Policy Q&A | company-context.md |
Fully Autonomous | Two-part answer: company-specific rules first, then general guidance |
| Content Repurposing | Raw Transcript/Article | Auto-save to Drafts | Multi-platform snippets (X, LinkedIn, Threads) in brand voice |
Require Claude to show its plan before any complex task [5][8]. That small step saves a lot of wasted usage when the logic goes sideways early. For data-heavy roles, test with messy files on purpose, such as missing headers or mixed date formats, so you can confirm the validation logic holds up [10].
Launch with a Human Owner and a Clear Deployment Plan
If the tests pass, assign one owner and move into a limited rollout.
Every scheduled task needs one named human owner. That person reviews outputs, spots drift, and makes judgment calls the AI can’t [3]. Without one owner, accountability gets fuzzy and duplicate actions start to creep in. A role only starts to feel like an AI employee when one person can review it, correct it, and keep it on track.
Start with one or two high-value tasks first [3]. Keep a strict "draft, never send" rule for all customer-facing output for at least the first 90 days [3].
Scheduled tasks only run while your computer is awake and the Claude Desktop app is open [3]. During testing, turn on completion notifications so you can review outputs as soon as they finish [7].
Use a Launch Checklist and Monthly Review
After launch, keep the role tight and review it on a fixed schedule.
Before going live, confirm that your context files are loaded, CLAUDE.md is written, folder access is scoped, approval tiers are defined, and each task type has at least one test run completed. Store each working prompt in a dedicated runbook folder [3][8].
After launch, set a recurring 15-minute monthly review [3]. Think of it as the control loop that keeps the AI employee lined up with the business role. Use it for the maintenance work below:
| Action | What to Do |
|---|---|
| Folder Audit | Remove access to any data the role no longer needs |
| Task Pruning | Delete scheduled tasks that no longer earn their usage cost |
| Context Update | Update CLAUDE.md with new staff, tools, or brand rules |
| Connector Check | Verify Gmail, Slack, and CRM authorizations are still active and correctly scoped |
| Release Review | Skim Anthropic release notes for new connectors or model updates |
FAQs
How do I choose the best first AI role?
Choose a repeatable task with a clear workflow, more than one input, and a specific output you can check fast.
Start with work where you already know what “good” looks like. That makes it much easier to spot errors, tighten the process, and trust the result.
The best first role usually sits in the repetitive middle of a workflow. It takes the boring, step-by-step work off your plate and turns a set of inputs into a concrete deliverable.
Chat is still better for one-off questions. This works best for process-driven tasks you do again and again.
What belongs in CLAUDE.md and memory.md?
CLAUDE.md is your agent’s persistent core identity. It loads at the start of every session, so keep it short and focused. Put the business description, project goals, must-follow rules, and key file paths or folder structure there.
memory.md files work better as on-demand reference docs. Use them for workflow notes, role-specific instructions, or project details the agent should pull in only when the task needs them.
How much human review does an AI employee need?
It depends on the task’s complexity and impact. With Claude Cowork, the goal is to shift your role from babysitting the process to reviewing the finished deliverable.
In many autonomous workflows, you act as the final quality check. The AI might draft a quote or email, for example, and you review, edit, and approve it before it goes out. You can also give feedback during sessions, so it gets better on future tasks.